Wow, I have been having so much fun with demi! In this post I want to share how demi has worked best for me so far. My own ‘demi method’ is more of a combination of how I was already doing my makeup, but with demi over top. Another change I have noted from the way I used to do my makeup is that I add more vibrant colour instead of just ‘darkening’ or bronzing my skin. I think this one step could be a game-changer for you too. I have shared a couple videos on my social media about others using a similar hybrid or fusion technique of natural coverage + demi. I had already been avoiding applying a lot of makeup around my under-eyes and around my smile lines, because that is where it can look more visible as you smile and squint your eyes multiple times throughout the day. With demi it doesn’t have to be all or nothing. If, for the most part, you have been enjoying your makeup, you may just want to incorporate a little demi around your eyes or to camouflage some melasma or hyperpigmentation on your cheeks. I have created foundation that has potent skincare qualities. It is like a nourishing face mask on your skin all day that happens to be almost invisible, so why would I want to skip that?
I need to vent
I get a little frustrated when all makeup is lumped together as being toxic, heavy and suffocating, and creating a thick, cakey look on the skin. I get that there are a lot of generic concealers and foundations that do not look pretty on the skin. Ingredients matter. If a formula has a look or feel to it that you do not like or if it breaks down on the skin, take note of the ingredients in it. If you went to a coffee shop, bought a coffee, took a few sips, and realized you did not like something about the taste of that coffee, would you immediately jump to the conclusion that you do not like coffee? You may want to know where they sourced their water to make the coffee, or the brand of coffee grounds, if it was organic, and the level of acidity. Because my makeup ingredients are totally unique from other lines, so are the results. Also, because my formulas are unique, the makeup application that works best can be very different. It is also important to experiment with what works best in the unique climate you live in and what works with your unique skin.
forget everything you think you know about makeup and just start fresh
I am highlighting the demi method technique in this post but even if you are not into learning about this new method, or have no idea what I am talking about, I promise you will learn something important here. Through practicing demi I have realized I needed to unlearn some makeup knowledge that was not working for me. Because I learned it in makeup school, I often thought, well maybe it is just me.
Here is what I have found works really well under demi:
- any of my coverage options but I especially like the serums if you are looking for the most natural look. I usually reach for my molecular hydrogen + sugarcane serum. I like to apply it all over the face except the under eye and my nose. Then I follow with step 2. If you would rather just spot cover smaller areas, you may want to opt for a cream coverage instead of a more fluid one. You may like my dewy hdd, coconut balm, or concealing cream.
- a light application of my shilajit bio-foundation where needed because it is moisture-balancing and it gives the colour-correcting shades something to adhere to. If you can see it on the skin, you have applied too much. I also like to tap a little over a cream tint eyeshadow wash on my eyes to create a more matte finish. My aloe loose tints will mattify in the same way if you want to layer a more vibrant colour over your eyeshadow.
- lastly, the demi method starting with toning (refer to the tutorial video below for all the steps).
I highly recommend watching the demi tutorial below from beginning to end on a tv screen or at least on a lap top screen so you can see all the smallest details. If you read my previous post about what I have learned from watching makeup videos, you know how picky I am about makeup video lighting. I 100% approve of this video because this artist realized that what she was trying to point out was not showing on camera in previous demi tutorials. So she turned off the studio lighting and incorporated natural lighting for this one tutorial.
Do not spend too much time trying to figure out if a freckle is green, or brown, or blue because you may never finish applying your makeup.
Also, she is so very thorough in addressing what a lot of non-makeup artists could find confusing about colour theory and she simplifies it. She mentions something that I wanted to also stress in this post. Do not spend too much time trying to figure out if a freckle is green, or brown, or blue because you may never finish applying your makeup. What looks one colour on your skin tone can actually be a totally different colour, so try camouflaging the area or spot with peach, yellow and even your concealing cream shade one at a time to see if one makes the area of distraction magically disappear. That is when you know you have found the right demi colour. If you cannot find the right demi colour and you are totally stumped, just click the ‘?’ box at the bottom right corner of this post and send me a photo of the area you are trying to camouflage so that I can help. Keep in mind that the demi method is not brand specific, but the shades she sometimes refers to are, so just ask if you want an equal colour from my line to a specific colour she uses. If I don’t have it, I will create it for you.

{you may want to screenshot the above ‘cheat sheet’ so that you can look for what shade she is using when she mentions it in the video tutorial above and you can’t quite see the colour!}
a couple things to keep in mind with my formulas
my cream brighteners, cream tints, and concealing creams have more built in coverage than my balms and shade-changers. The balms and shade-changers are more translucent (like a balm) and have more intense colour to them for medium to dark skin tones. Also, by mixing a little white cream brightener or a different cream brightener with a cream tint, balm, or shade-changer, you can slightly alter the colour and add a boost of coverage and brightening if the shade is a little too dark or a little too much of one undertone. For example, I often mix my orange brightener with my illuminating cream tint or he’s the one cream tint for a cheek colour. The possibilities are endless. If you are constantly mixing two colours together, I can create a custom colour for you upon request.
my own little demi technique – pixelated makeup
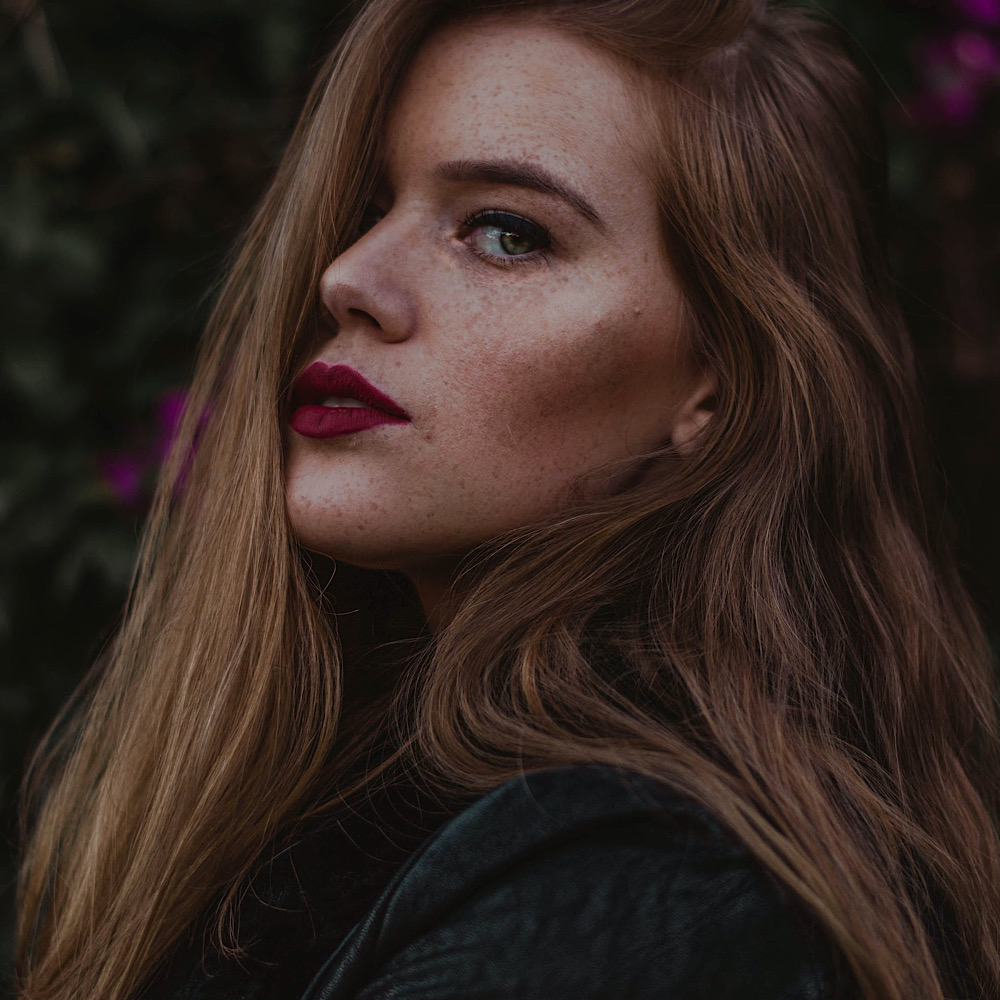
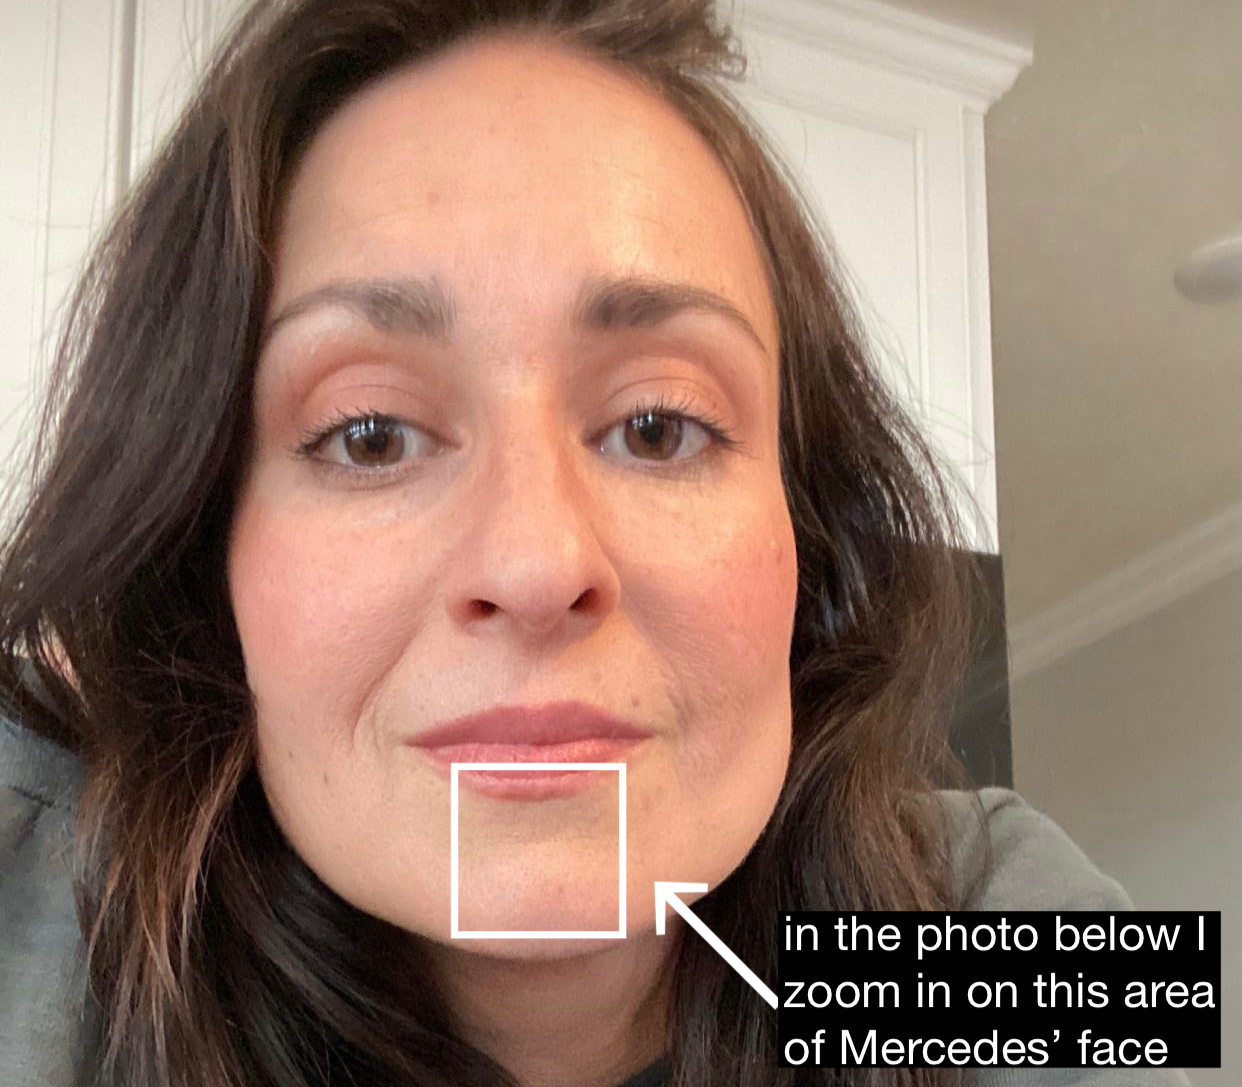
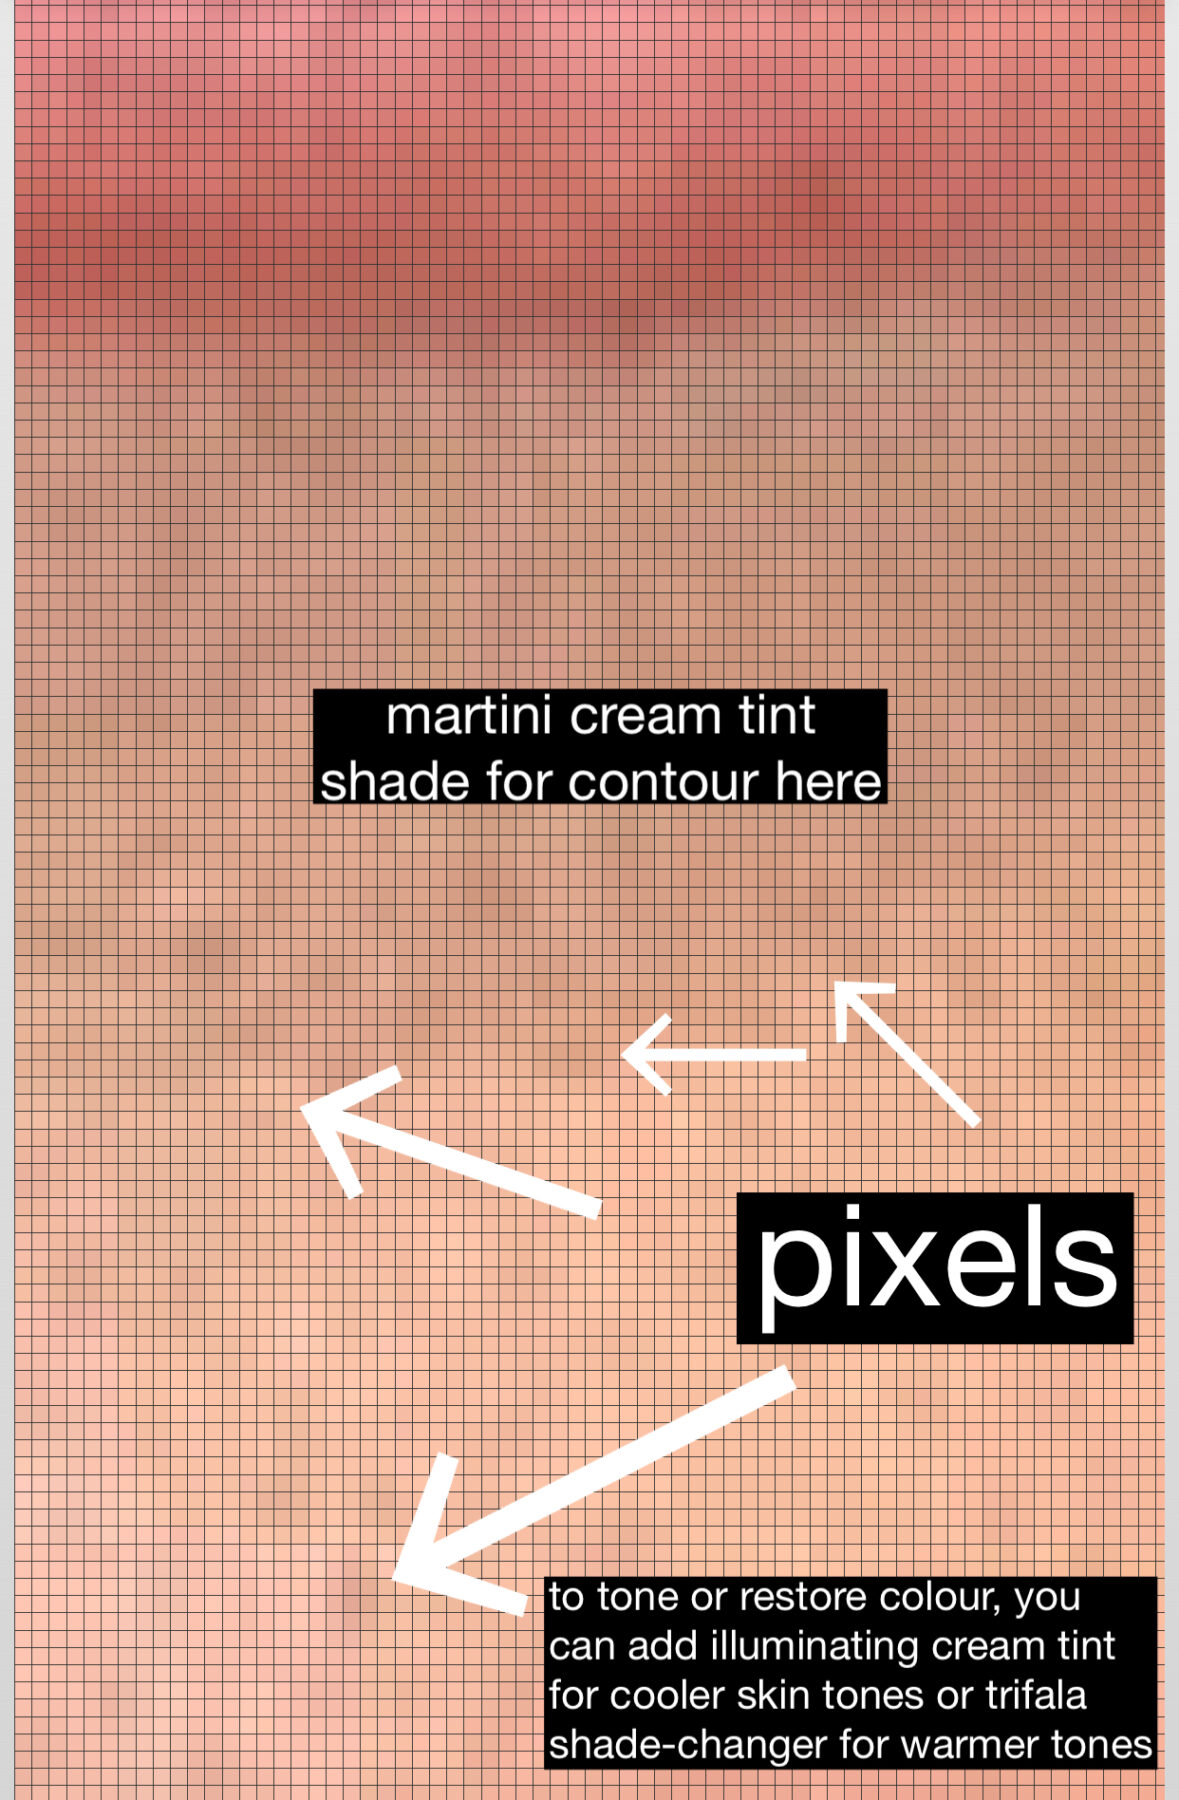
A technique I have found that helps me achieve that smooth look to the excess pigment or excess pale tone surprisingly quickly is this – instead of the ‘feather-light blending’ or ‘erasing’ technique when colour correcting, I lightly stipple or blot the skin, either with the finely pointed end of the eyes have it brush if it is a tiny area, or with my fingers if the brush is not doing the trick or it is a larger area – or both. For example, I have a small area on one cheekbone where it is void of freckles. So instead of brightening all around it which I have been doing for years, I take the eyes have it brush and my martini cream tint (which is equal to the colour of most freckles/hyperpigmentation on fair to medium skin tones) and I stipple the brush to add tiny ‘freckles’ to that extra-bright area and – just like that – my entire cheek is balanced. Even where I don’t have freckles, I have found just adding freckles or ‘pixels’ of colour or – the opposite – pixels of brightening – often works better for me than the blending technique. Think about zooming in really close on a picture until all you see are the squares of blurry individual pixels. See the examples i have included below of Mercedes zoomed out and zoomed in. You can even see more clearly zoomed in that if she wanted to add more of a shadow below her bottom lip for more of a pout, she would add martini cream tint to match that shadowy tone and that would be her best contour shade anywhere on her face. The tiny ‘pixels’ of colour are what you are manipulating when you do demi. And like the artist in the tutorial video explains, when you hit the very darkest points (or pixels) first, you will find it camouflages distractions and creates balance much faster than you think it will. When you add a little colour or brightening, don’t forget to take a few steps away from the mirror, or ‘zoom out’ to observe your work. Have fun playing!
If you missed my first post about the demi method, here is the link.