
The more I watch demi videos by makeup artists, the more it seems like it’s becoming one of those techniques where they are choosing a more advanced direction. Maybe some are up for the challenge but for the rest it could be making demi or corrective makeup application seem way more complicated than it needs to be. The results are so incredible and equally incredible for all-ages, that I want to re-introduce demi in a much more uncomplicated way. I am watching artists colour in tiny light spots with the formula of DHA self tanning products (undiluted). The formulas are a mix of the active ingredient – DHA and petroleum lake dyes which are used to dye eggs at Easter. So it is one route you can take. Colour is colour, and because of the presence of dyes, it can last a few days. However, if someone has a special event and they go overboard, it can be a disaster. Also, I can still taste the dye I ate at too many childhood birthday parties because I loved icing! It was such a surprisingly strong, bitter metallic taste that even putting it on my skin now is not something I am willing to risk. To use those dyes as a semi-permanent type of makeup I think it requires a certain level of experience and precision either as a makeup artist or any type of artist familiar with the burn/dodge tool in photoshop. You also have to have the patience and time to colour in teeny tiny areas. Realistically, I don’t think most people have the experience, time, or attention span to incorporate the tanner pen part. I have been experimenting over the summer and find that even when I choose a more simple approach to demi, I can get the same no-texture results. So I will share the steps below. Even then, you can skip a step or two and still get a healthy, polished look that works for every age.
So I want to focus on the most uncomplicated version of the demi method/corrective makeup, both for myself and for my clients – at least to begin with. A great example of that is the victoria’s secret angel makeup that is trending right now, where a touch of orange, red, or pink is added to the places the sun would give you a little colour if you were at the beach. For this, you would want to focus on three products, maybe four. I always like to start with the lightest or second lightest caramel tan shade, applied once or twice a week to maintain the colour. This doesn’t make your face look ‘dark’, it just counteracts the blue undertones with a warm, gold tone. Then, on top of that, you want to custom apply a little foundation where needed. I like to use the serum foundation and a touch of shilajit bio-foundation to give the coverage a little more longevity. Then a little bronzer where needed to tone down puffiness, an orange, pink, or red tone over top, and a brightener where you need to tone down any sunspots or create more volume in certain areas. You want to accentuate what we naturally already have – a mosaic of colours.
step 1 – exfoliate well
This step sets the stage for how natural + glowy your makeup will look. We need to do a light exfoliation at least twice a week. This keeps skin looking plump and smooth.
step 2 – apply your favourite coverage
For me, my favourite coverage for demi is the serum foundation because it is undetectable when you apply it on the lighter side (not meaning a lighter shade but a lighter application) to skin. You are going to use another product at the end to lighten dark spots and even out any redness. If you feel that your skin needs a little mattifying in areas or all over, follow your favourite coverage with a matching bio-foundation shade. Again, you are going to even out your skin at the end, this is more to ‘prep your canvas’ create longevity of your makeup throughout the day so don’t overdue it by applying too much product. Less is more with demi.
step 3 – restore colour
bronzer or a coverage that is 2-3 shades darker or my caramel tan as a base where colour is needed OR a little of each! If you are applying the caramel tan to restore colour, it needs 24-48 for the colour to show. For me, I choose a couple shades lighter for my face than for my body because I am not wanting my face to be darker, I am just trying to counteract the tinges of blues, greys, and green undertones in my skin to bring it back to life. We lose that colour as we get older. It’s like someone holding their breath too long and their face turning a pale blue. You want to concentrate a little extra colour where the sun would naturally tan you – the top and sides of forehead, bridge of nose, and perhaps a touch on the cheeks. If you want to create the look of a fuller cheek, use none or very little bronzer as a cheek contour.
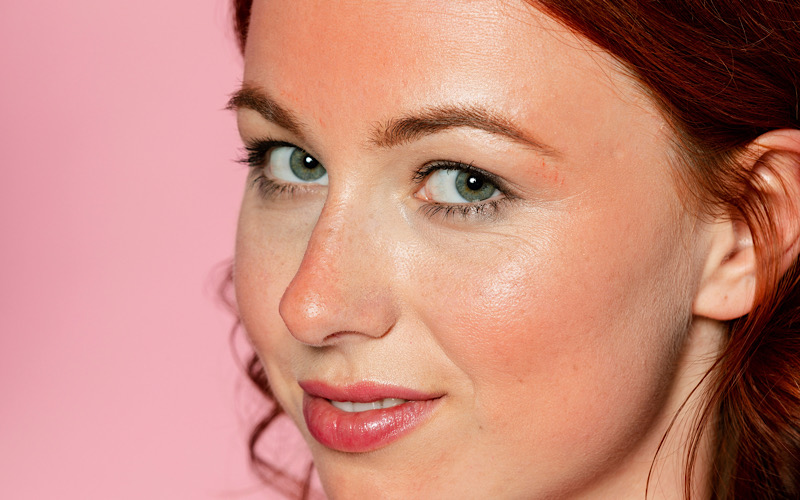
step 4 – get a sunburn
let me make this step crystal clear – do not go out and get a real sunburn. We want to create the look of a light, sun kissed tan (step 3) with a touch of a ‘sunburn’ shade colour over top. So close your eyes and think back to when you have gotten a sunburn on your face in the past and what shade that colour looked like. It is a different tone on everyone. And keep in mind that the shade that shows up on your skin will be different than the way the colour of product looks in the packaging.. For some, even a tan looks like a sunburn. You want to mimic that but a very subtle version. If you look a little too sunburnt, don’t worry, it will be easy to tone down in step 6. From my line, depending on how light or rich your skin tone is, these are the most popular shades: he’s the one cream tint, orange brightener, peace cream tint, possibility balm, acerola shade-changer, and dragonfruit shade-changer. Here is an example, it’s a little extreme but if you notice the flush of colour on the forehead and cheeks reaally make her eyes pop:
step 5 – decorate eyes, cheeks and lips with colour
the style is totally up to you, this allows you to add your own personal touch. I think with demi natural but full brows, a light smokey eye looks really pretty, as well as a more nude lip or a lip with a pop of pink in whatever shade suits you best.
step 6 – camouflage + brighten where needed
with a smaller, detailed brush like my eraser brush and the eyes have it brush, neutralize any uneven spots. The shade of brightener or concealing cream you use is very important. a sunspot is more of a blue-green shade while a broken capillary is purple. Darkness under the eyes can have a grey/blue undertone to it. If you are not sure which colour you need to counteract and camouflage an area – just take a close-up photo in natural lighting and I will let you know what I would recommend. The size of the brush should match the areaa you are brightening. If the brush is too large, it will create a halo around the darker or different coloured area.
The best way to find your demi makeup groove is to do half of your face and leave the other half makeup-free so you can compare. This part is actually helpful and you learn quickly when you can keep comparing your demi to the no-makeup side. Please send me your before and after photos if you try it! If you have questions about the right shades to use for your skin tone I love to help. Just leave a message for me in the little message box in the right bottom corner of this page. Have fun playing! If you would like to watch a few demi videos they are here!